Installing NGINX on EC2
"Step-by-Step Guide to Installing Nginx on an EC2 Instance"

What is NGINX ?
Nginx was created by Russian developer - Igor Sysoev in 2004 . It's pronounced as "Engine-x" and act as a versatile web server that can also be used as a Reverse Proxy, Load Balancer, Mail Proxy and HTTP cache.
To put it more simply, NGINX is your middle man that handles all the traffic coming onto your server and also act as a proxy server. A basic idea to understand it, is to think of VPN and how it acts as a proxy server :

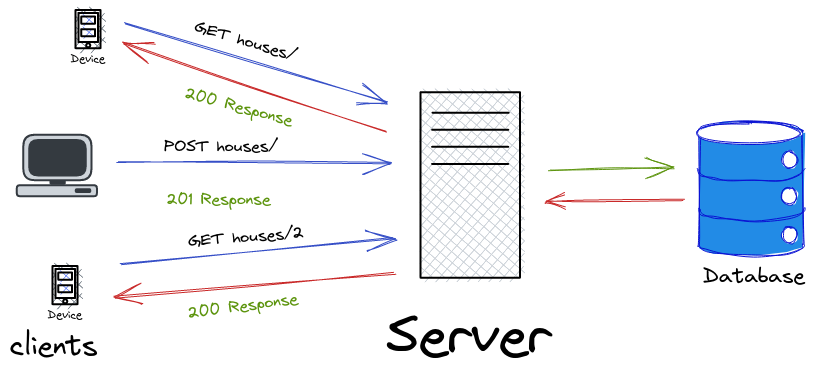
Forward and Reverse Proxy :
Forward Proxy : When you have multiple number of clients request directed toward one server, and the proxy in between redirect the request as its own is known as forward proxy. The proxy shares its IP address with the destination server rather than revealing the client's IP address.

Reverse Proxy : Reverse proxy is a type of proxy server that sits in front of one or more servers and when a request from a user is received, it send back the response as if it originated from the proxy server itself.

Load Balancer :
Load Balancer is a system that distributes incoming traffic across multiple serves to ensure that no single server become overwhelmed. This keep the performance and reliability of applications optimal.
HTTP Cache :
The HTTP cache in Nginx is a mechanism by which the Nginx stores copies of responses from backend servers so that subsequent request for the same resources can be delivered more quickly from the cache.
NGINX on EC2 :
We'll start by going to "EC2 instance connect" in the instance menu, There are also other ways to access your EC2 instances, which I covered in my last blog.

- We use
sudo -ito gain access of our instance as a root user and to make administrative task. sudo stands for "superuser do". It gives use elevated privilege's as a root user to make any changes in our instance whether its installing a new tool or to create a file in the directory.

- The
apt-get updateis used to update the package index on our system. The package index is a local database of available software packages, used by the package management system to track and manage installed, upgradeable, or removable software. keep in mind that the command does not install or upgrade any packages. It simply updates the list of available packages and their versions.

- You can check weather you have Nginx on your machine or not by using
nginx -tcommand in the command shell.

- Now to install Nginx, use the command
apt-get install nginxto install nginx on our instance and then press 'y' to continue.

- We can re-check to ensure that Nginx is installed correctly, and if it is, we'll see the expected results! (let's go!)

- To check the running status of our nginx server, use
service nginx statusand all the all the details will appear.

- Running
curl localhostin the terminal sends an HTTP request to the web server running on our instance (atlocalhost). This command is often used to test whether a web server or web application is running and responding correctly on the machine.

- you want to know where this file came from, you can change the directory using
cd /var/www/html/and uselsto see all the files in the directory. usecat <filename>to display the content of the file.

- Another thing you can do is use
echo "Welcome to the blog" > index.htmlto change the content of theindex.htmlfile. Again use curl localhost and the text you wrote will be displayed.
Ending Note :
You can delete the instance if you want to, simply select it and click on terminate. Hope this blog helped you and you got to learn something.
Thank you for following along with this Blog 🙋♂️. If you found this useful, please check out other blogs as well.
If you have any questions or run into any issues, feel free to leave a comment or reach out .
Happy cloud computing! 🚀
Credits :
Gaurav Sharma's AWS playlist : Link


